Film effect using the GIMP
Doesn't film look different from digital photography? In case you have some old film photos, dig them up and compare the differences with the digital photographs of today.
In the good ol' days, each film had its own response to colour and light. Photographers used to choose the right brand of film for their tastes and for the occasion, and would process it in their darkrooms. (I always used Kodak Max 400 ISO film, mainly because it worked indoors as well as outdoors, and I did not have a darkroom. Wait! I don't think I ever was a photographer. :))
Why this introduction? It is to emphasise a fact that there is no right way to achieve a film effect. This is just one variant. The exact effect that you seek to achieve would of course depend upon the film whose effect you are trying to replicate.
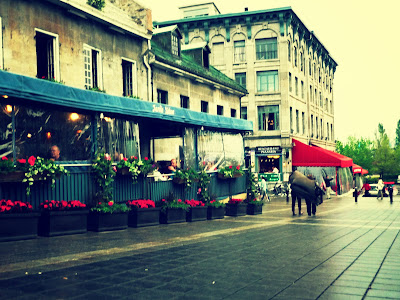
So, without much ado, I shall start, as always, with the finished goods. (I do not like posting pictures of people I know, so I shall post pictures of complete strangers, taken on the street.)
using this image
Duplicate the image to a new layer, name it curves adjusted.
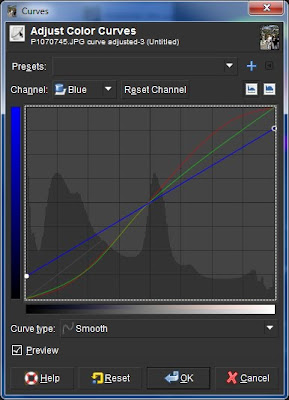
Adjust the curves channel by channel so that they resemble such a configuration.
Place both the layers in a new group called Base, reduce the opacity of the curves adjusted layer so as to achieve an effect that pleases you. (I set it at around 70%.)
Add a new layer, call it Tint Overlay, fill it with a blue colour
change the layer mode to screen and opacity to a value that suits you (5% for me).
Duplicate the base image layer group
merge the layer group, rename it to Soft Light Overlay and desaturate it based on luminosity.
Change the layer mode to soft light.
This gives the image the right amount of contrast as shown on any film, and also achieves the lower dynamic range of film.
At this point, the image looks quite acceptable for a film effect. However, I like to add a vignette to the image to simulate a poor lens, as well as to draw attention to the central content of the image, which is the couple. So, this part of the tutorial concentrates on adding that vignette effect.
First, we must understand a vignette. A lens of poor quality does not expose the entire film uniformly, but exposes parts of the film closer to the axis more than the parts away from the axis of the lens. This leads to a brightening near the centre of the image and a darkening over the periphery.
To obtain a vignette, create a new layer group, name it (no surprises here) Vignette. Within that layer group, create two layers, Vignette White and Vignette Black; with Vignette White underneath Vignette Black.
For obtaining the exact centre of the image, you'll need guides, so go to image > guides > new guide (by percent)
Add a horizontal guide at 50%, repeat and add a vertical guide at 50%. The intersection of these guides gives the centre of the image.Select the Vignette White layer, select the gradient tool, radial gradient mode, FG to transparency, set FG colour to white and draw the gradient, from the point of intersection of the guides (the tool gets sticky near the guides) to a point as far from the centre of the image as the image width (approximately).
Change the foreground colour to black, invert the gradient direction so that it goes from transparency to black
and then draw the gradient in the Vignette Black layer dragging the gradient tool from the centre to just outside the image width (see the image below for reference).Now, change the mode of the Vignette layer group to overlay,
and reduce opacity to around 70%.That's all folks!!! Did you expect anything so easy?
UPDATE: You can get a script for the film effect on my GitHub. Please note that I've modified the curves a bit, so the effect will be slightly different.


Comments
Post a Comment