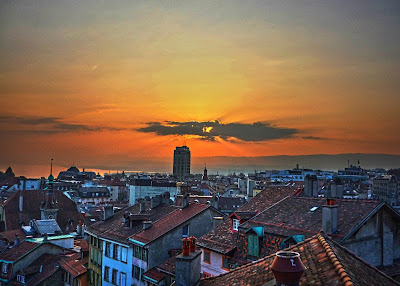
HDR Tutorial: Sunset over the Lausanne Skyline
Another HDR tutorial. In this tutorial, I shall show how to create HDR images like this one
from the below three imagesTo make this HDR, fire up Luminance HDR. Select the option to create a new HDR image
In the wizard that pops up, click on next.Load the three images in Luminance HDR. As these images were taken hand-held, and not using a tripod, they need to be aligned. Make sure that the auto-align option is enabled, and that the method is Hugin align_image_stack
Click next and let Hugin align images for you.A window pops up, which shows the aligned images. Make sure that the images are aligned. Then, click next.
A window pops up where you can select your HDR creation profile. Profile 1 works very well, so I'll stick with that. Click next.
Now, save the HDR image that is displayed. If you wish to manipulate the image any further, you can start at this point.
Set the tone-mapping operator to Ashikhmin, simple, equation 2. Make sure that the "Update current LDR" option is de-selected.
Hit tonemap to get the tone-mapped image. and save the tonemapped image immediately.Set the operator to Fattal, default values work well. Hit tonemap to get the second image.
save it.Now, we're done with Luminance HDR. Fire up the GIMP.
Remember that Luminance strips all EXIF data from the images. To get it back, load the 0EV image into GIMP.
then add the two images generated through the Ashikhmin and Fattal algorithms respectively as layers.At this point, we don't need the base image (the SOOC 0EV), so we delete that layer.
Make sure that the Fattal layer is above the Ashikhmin layer, then change the layer blending mode of the Fattal layer to Multiply.
Export the image. At this time, the image is rather good, but let's try to improve it further.
Load the image in Raw Therapee.
I changed the profile to Insert Copyright, which basically is Neutral, but it also inserts my copyright information in the image.Then select auto-exposure. Generally, it is good enough. In this case, however, I had to increase brightness to 5 points.
Modify the tone curve
Increase vibrance just a bit (5 points)
Now, I crop the image to get rid of the ugly borders that crept into the process with Luminance HDR (qtpfsgui), mainly because the images were not aligned. While aligning the images, Luminance HDR replaced the missing parts in each image with black, which lead to the defects at the border of the image. These defects must be manually cropped out.
Lastly, I add IPTC metadata, which includes headline, caption, tags, etc.
and then send the image to the queue for processing.Head over to the queue tab. I keep the autostart feature off, as it really slows down processing if I have multiple images to process. It's a simple matter of starting the queue processing operation.
And that's the entire workflow I use to get an HDR image. Okay, so you Photomatix users will probably think that it's a lot of work to do, but tell you what, I like the freedom it gives me. Even so, pro HDR photographers like Trey Ratcliff or Victor Lacken anyway do a lot of post even on pictures out of Photomatix.
Lausanne is a really beautiful place to visit. The next time you are in the area, do make a point to visit Lausanne.
As always, feel free to leave comments below, or share this tutorial on your favourite social networking website.
Get the software mentioned in this tutorial from the links below.


I'm a bit confused with your workflow so I have a couple of questions. Why use Gimp and not the built in tonemap presets in Luminance? Okay, so let's say the Gimp workflow is superior. What format are you exporting from Gimp to later use in Raw Therapee? RAW?
ReplyDeleteThanks for your tutorials. They really help understand these opensource apps!
To begin with, the tone-mapping options in Luminance are not the "final product". My workflow uses multiple tone-mapping options to generate the final image. This is why I used two different outputs (Ashikhmin and Fattal), and then merged them in GIMP using layer blending modes (multiply in this case, overlay also may work; I chose multiply because I wanted strong contrast between the clouds and the sunbeams).
DeleteI then export the JPEG from GIMP, and used Raw Therapee for final adjustments to exposure, saturation, crop, etc. These changes can be done in GIMP too, it's just that it's easier to do this in Raw Therapee than in the GIMP.
Hope this helps. Stay tuned; a friend has agreed to share his HDR workflow here. The post ought to be up in a few days/weeks.
This is a very helpful tutorial on creating HDR images.
ReplyDelete