GIMP script for the Lomo effect
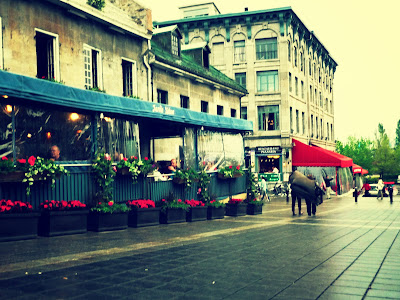
So, here's a GIMP script for achieving the Lomo effect. The script will enable you to create pictures that look like this:
from an image like this:The original image was taken using the camera on my phone (LG P500), a really sad 3.2 MP camera. Nevertheless, I think the image makes an ideal example for demonstrating the Lomo effect, which is why I included it.
If you search on the internet, you'll probably find a number of tutorials on how to fake the Lomo effect. The trouble is that they don't seem to agree much with each other. Bummer! So, I came up with my own technique (if you feel that the technique is flawed, let me know, I'll correct it) based on what I thought gives the effect seen in many Lomo photographs.
Basically, I increase contrast on the red and green channels, decrease contrast on the blue channel; all using curves, then increase the saturation and add a vignette.
Without much ado, here is the script:
UPDATE: The code is now available on my GitHub repository.
;An example script for the lomo effect.
;This script increases contrast on the red and green channels, decreases contrast on the blue channel, and increases saturation on the image. It also adds a Vignette.

(define (script-fu-lomo-effect img drawable)

        ;Create a new layer
        (define curves-layer (car (gimp-layer-new-from-visible img img "Curves")))
        (gimp-image-insert-layer img curves-layer 0 0)

        ;Modify the curves
        (gimp-curves-spline curves-layer HISTOGRAM-RED 8 #(0 0 60 30 190 220 255 255))
 (gimp-curves-spline curves-layer HISTOGRAM-GREEN 8 #(0 0 60 30 190 220 255 255))
 (gimp-curves-spline curves-layer HISTOGRAM-BLUE 8 #(0 0 30 60 220 190 255 255))
        ;Increase the saturation
        (gimp-hue-saturation curves-layer ALL-HUES 0 0 50)

        ;Now, add vignette layer group
 (define vignette-group (car (gimp-layer-group-new img)))
 (gimp-item-set-name vignette-group "Vignette")
 (gimp-layer-set-mode vignette-group OVERLAY-MODE)
 (gimp-layer-set-opacity vignette-group 100)
 (gimp-image-insert-layer img vignette-group 0 0)

 (define img-height (car (gimp-image-height img)))
 (define img-width (car (gimp-image-width img)))

 ;Now, for the vignette layers
 (define vignette-white (car (gimp-layer-new img img-width img-height RGBA-IMAGE "White" 100 NORMAL-MODE)))
 (gimp-image-insert-layer img vignette-white vignette-group 0)
 (gimp-context-set-foreground '(255 255 255))
 (gimp-edit-blend vignette-white FG-TRANSPARENT-MODE NORMAL-MODE GRADIENT-RADIAL 100 0 REPEAT-NONE FALSE FALSE 1 0 TRUE (/ img-width 2) (/ img-height 2) (* img-width 1.5) (* img-height 1.5))
 (define vignette-black (car (gimp-layer-new img img-width img-height RGBA-IMAGE "Black" 100 NORMAL-MODE)))
 (gimp-image-insert-layer img vignette-black vignette-group 0)
 (gimp-context-set-foreground '(0 0 0))
 (gimp-edit-blend vignette-black FG-TRANSPARENT-MODE NORMAL-MODE GRADIENT-RADIAL 100 0 REPEAT-NONE TRUE FALSE 1 0 TRUE (/ img-width 2) (/ img-height 2) img-width img-height)

        ;Refresh the display
        (gimp-displays-flush)
)

(script-fu-register "script-fu-lomo-effect" "Lomo Effect" "Apply a Lomo effect to visible image" "Skand Hurkat" "Skand Hurkat" "2012" "RGB*" SF-IMAGE "Image" 0 SF-DRAWABLE "Image to apply retro effect" 0)

(script-fu-menu-register "script-fu-lomo-effect" "<Image>/Filters/Artistic")
The script is registered under Filters > Artistic by the name "Lomo effect".
As always, I look forward to receiving some feedback. Take some time to hit "+1" or share it with your Facebook friends or twitter contacts. Or leave a comment below.


Comments
Post a Comment