Understanding HDR Photography
HDR is the new buzzword in photography, with more and more people discovering the HDR concept, and more and more people taking bracketed shots.
This way to start a post is the ultimate example of putting the cart before the horse. This is a technical post explaining HDR (High Dynamic Range) photography, and I have started writing about HDR before explaining it.
This post has to be technical you cannot be an FOSS Photographer without understanding the technicalities of the subject of photography, especially when it comes to FOSS options for HDR imaging.
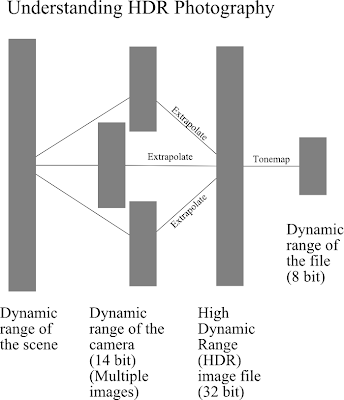
So, what exactly is HDR? Broadly, many people have the idea that HDR images are the overly saturated ones, with a high contrast and stunning detail. The ones who look at histograms may identify an HDR image with a flat histogram. Actually, HDR is a way of capturing more light information than your camera can capture by taking multiple exposures at varying settings. This image may explain something
Tell you what, HDR is not all that easy.
Most of the time, your camera can easily capture the dynamic range of a scene. Sometimes it doesn't, because the dynamic range of the scene exceeds the dynamic range of the camera. In this case, highlights and/or shadows are clipped, depending upon the exposure settings on your camera. The camera typically uses a 14 bit ADC (12 bit in some rare cases) and gets a 14 bit raw image. This raw image, however, cannot be stored in the JPEG format, which is an 8 bit format (the 12 bit format is not widely supported). In this processing, the mapping in the ADC values and the JPEG image is not linear, but is a gamma mapping. This means that the JPEG file generally has a dynamic range of 11 stops, good enough for most photographs. However, the loss of bits means that image information is lost, irreversibly.
In case of exposure fusion technique discussed in a previous link, we take multiple images and then merge them by selecting certain parts of the image which are correctly exposed. In a way, this method does cover the entire dynamic range of the scene, but it does not capture the true dynamic range as it is. However, this still overcomes the limited dynamic range of the camera, hence may be considered an HDR technique.
True HDR photography involves taking multiple shots to cover the entire dynamic range, then extrapolating the radiance map from the multiple images into an HDR image. However, this image cannot be displayed on any device that we possess, because of the limited dynamic range of the output devices at our disposal. These output devices include monitors, printers and so forth. Hence, we need to map down the high dynamic range image to a low dynamic range image that can be displayed on an output device. This process is called tone-mapping.
Of course, most medical images are HDR. They are monochrome and can be easily displayed on a low dynamic range monitor using a false colour output. However, a false colour image may not be desirable in a photograph for obvious reasons. Some people, especially ones with initials T.R. who are top posters on Google+ may call such images digital art, and may even get 500 "+1"s on that image; however, the majority of us do not consider such images aesthetically pleasing (or so I hope).
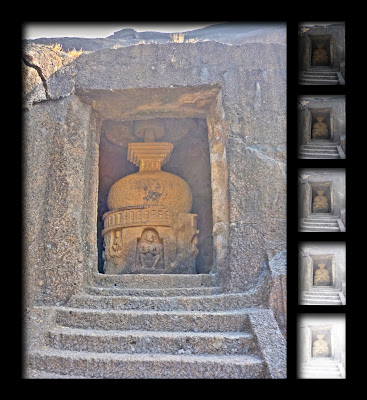
So, how do we display a HDR image on an LDR monitor? Short answer, we cannot. So, we seek to manipulate the image so that we have sufficient details, as well as local contrast, but a low enough dynamic range so as to display on our LDR output device. Have a look at the first image in this post. The dynamic range of the scene exceeds that of my camera. My camera cannot get the details on the inside and the outside of the cave properly, so I took multiple images. In the under-exposed images (top right), the details on the outside of the cave are clearly visible, but the details on the (poorly illuminated) inside of the cave are visible only at higher exposure values (bottom right), when the details on the outside of the cave are completely blown out. When this happens, it is the right time to use HDR.
HDR works by taking the input images and computing the HDR radiance map from those images. Here, film and digital photography diverge. Film had a characteristic response to light. If multiple exposures of a scene were taken and scanned, the radiance map could be obtained by using the inverse function of the film response. Of course, the film response would saturate in the highlights and shadows, hence interpolation used a weighted average, with pixels values at either end being used with lesser confidence than pixel values near the middle of the dynamic range of film. For a true understanding of how this works, I would recommend that the reader refer to this paper.
With digital photography, the image sensors have a near-linear response to light. However, the compression from the 14 bit raw image to the 8 bit JPEG image uses non-linear transformations (indeed, sometimes, the image is tone-mapped, so the 8 bit JPEG out of a point and shoot camera may in fact be an HDR image, but most of the times, a gamma curve is used). Hence, knowing the camera response to light is not all that important, an interpolation may be done using a predetermined response function.
The next step is tone-mapping. This step has to ensure that all areas of the image are well exposed and retain local contrast. The simplest method then would be an adaptive histogram equalization over the HDR image. Indeed, this is one tone-mapping operator. However, a number of them have been proposed, and they all have different characteristics of representation of detail. With the large number of algorithms out there, it is not possible for me to list each and every algorithm. However, I shall discuss some algorithms and their characteristics when I write a post on how to get HDR images and then tone-map them using a free and open source software called Luminance HDR aka qtpfsgui.
Well, that's as much an introduction to HDR as I could write. Do provide feedback so that I can tailor my future posts to better suit your requirements.


Comments
Post a Comment